Published by James Mutumba – Latest update on 06/07/2021
ID: TN008
Relevant products: L-Edit, S-Edit, Tanner Calibre One, Tanner Digital Implementer (TDI)
Operating systems: Linux, Windows
Versions affected: Tanner Tools 2018.x and above
Relevant areas: Installation
Summary
In mixed operating system setups, where some tools are on a Windows machine and others on a Linux machine, it is important to establish a communication link between these two systems to enable integration.
For example, this enables S-Edit remote simulations on a Windows machine with the simulators AFS/eldo on a linux machine, and allows for back-annotation of the schematic with simulation data.
We can also perform DRC, LVS, parasitic extraction, digital synthesis and Place and Route using L-Edit on Windows and Nitro and Oasys on Linux.
This note shall guide you on how to set up this link in five primary steps.
Details
Step 1: Installation and configuration of PuTTY in Windows
- Please visit PuTTY’s official download page https://www.chiark.greenend.org.uk/~sgtatham/putty/latest.html and download the packaged installer, which includes all the PuTTY utilities
- After downloading it, please install as you would install any Windows program following the guidelines of the installation wizard
Step 2: Create SSH Keys with PuTTYgen
PuTTY has a companion tool named PuTTYgen (an RSA and DSA key generation utility) that can convert OpenSSH private key files into PuTTY’s format, allowing you to connect to a Linux server from a Windows machine, with the added security that SSH keys provide.
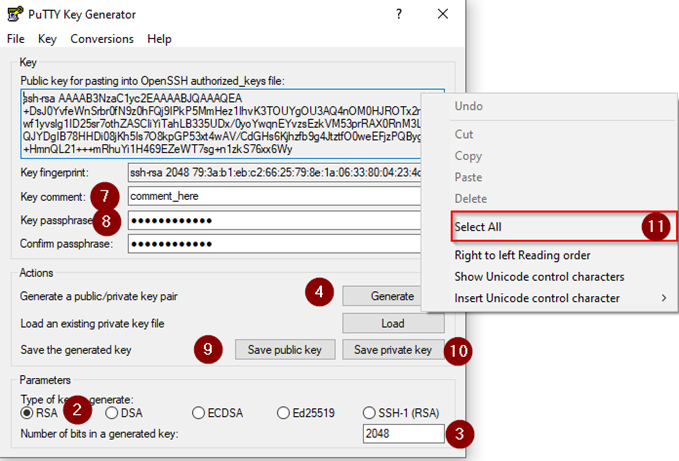
To generate a set of RSA keys with PuTTYgen:
- Start the PuTTYgen utility by double-clicking on its .exe file: after installation of the PuTTY package above, this can be found in the PuTTY installation folder or by simply typing PuTTYgen in the Start Menu
- For Type of key to generate, select RSA
- In the Number of bits in a generated key field, specify either 2048 or 4096 (increasing the bits makes it harder to crack the key by brute-force methods)
- Click the Generate button
- Move your mouse pointer around in the blank area of the Key section below the progress bar (to generate some randomness) until the progress bar is full
- A private/ public key pair has now been generated
- In the Key comment field, enter any comment you’d like to help you identify this key pair later (e.g. your e-mail address; home; office; etc.) — the key comment is instrumental in the event you end up creating more than one key pair
- Optional: Type a passphrase in the Key passphrase field & re-type the same passphrase in the Confirm passphrase field (if you would like to use your keys for automated processes, however, you should not create a passphrase)
- Click the Save public key button & choose whatever filename you’d like (some users create a folder in their computer named my_keys)
- Click the Save private key button & choose whatever filename you’d like (you can save it in the same location as the public key, but it should be a location that only you can access and that you will NOT lose! If you lose your keys and have disabled username/password logins in your SSH configuration on the Linux side, you will no longer be able to log in!)
- Right-click in the text field labelled Public key for pasting into OpenSSH authorized_keys file and choose Select All
- Right-click again in the same text field and choose Copy
NOTE: PuTTY and OpenSSH use different formats for public SSH keys. If the SSH Key you copied starts with “—- BEGIN SSH2 PUBLIC KEY …”, it is in the wrong format. Be sure to follow the instructions carefully. Your key should start with “ssh-rsa AAAA ….”
The steps below are described in the following graphic.
Step 3: Save The Public Key On The Server
The copied public key needs to be pasted into the file ~/.ssh/authorized_keys on your linux machine. To do this, follow the steps below
- Log in to your Linux machine
- If your SSH folder does not yet exist, create it manually:
mkdir ~/.ssh
chmod 0700 ~/.ssh
touch ~/.ssh/authorized_keys
chmod 0644 ~/.ssh/authorized_keys
- Paste the SSH public key copied from step 12 above into your ~/.ssh/authorized_keys file using your preferred text editor (recommended to use ‘nano’ or ‘vim’)
Step 4: Load the private key on your Windows machine
Pageant is a PuTTY authentication agent. It holds your private keys in memory so that you can use them whenever you are connecting to a server. It eliminates the need to:
- Explicitly specify the relevant key to each Linux user account, if you use more than one account to log into a server
- Type a key’s passphrase each time you log into your user account.
To add your private key to Pageant:
- Start Pageant from the PuTTY folder: Start Menu > All Programs > PuTTY > Pageant
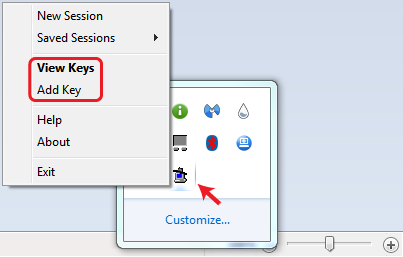
Pageant starts by default minimized in the system tray. To begin adding your SSH keys, double-click on its icon, and then the following context menu will show up:
- Clicking on Add Key from the menu or View Keys to open up the Pageant Key List window. Here you can view, add, and remove keys:
Tip: You can access the Pageant Key List window directly by double-clicking its icon in the system tray.
Click the Add Key button. This will open the file explorer, where you can choose one or more keys at a time to load. You should select files with the .ppk extension.
If a key is passphrase-protected, you will be prompted to enter the passphrase only once before it can be added to the Pageant Key List.
Once the key is loaded into the Pageant on the Windows side, and the public key has been pasted into the authrozed_keys file on the Linux machine, the link is ready.
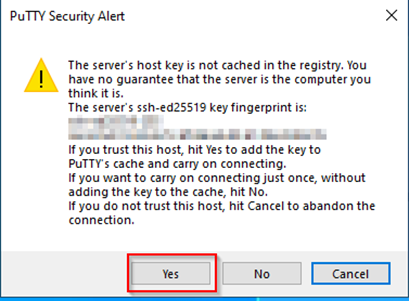
Test this by opening PuTTY, fill in the Hostname with username@IP and click on Open

A terminal should load without requiring a password.
Note: A one time window may pop up asking you to cache the host key into the registry. Please accept this.
Step 5: Loading Keys Automatically into Pageant on Startup
You can make Pageant automatically load one or more private keys when it starts up, instead of adding them manually every time you start up Pageant.
Go to the Pageant shortcut icon from the Windows Start Menu or your desktop.
Right-click on the icon, and click on Properties.
A new window will open containing the shortcut’s properties:
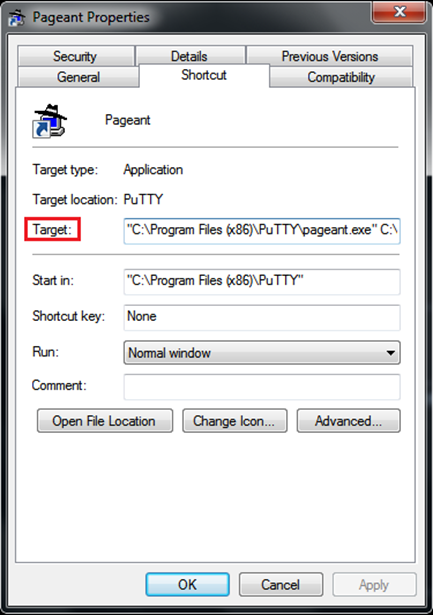
From the Shortcut tab, edit the Target field. Leave the path to pageant.exe intact. After that path, add paths to your .ppk key files. These should be outside the quotation marks. Here’s an example:
“C:\Program Files\PuTTY\pageant.exe” C:\key1.ppk C:\key2.ppk
Click the Apply and then OK buttons.
Note: If the keys are encrypted, Pageant will request the passphrases on startup.
Useful references
PuTTY FAQ: https://www.chiark.greenend.org.uk/~sgtatham/putty/faq.html
SSH keys: https://www.ssh.com/academy/ssh/key